
Delicious Vanilla Bean Crème Brûlée Cheesecake Recipe
Introduction
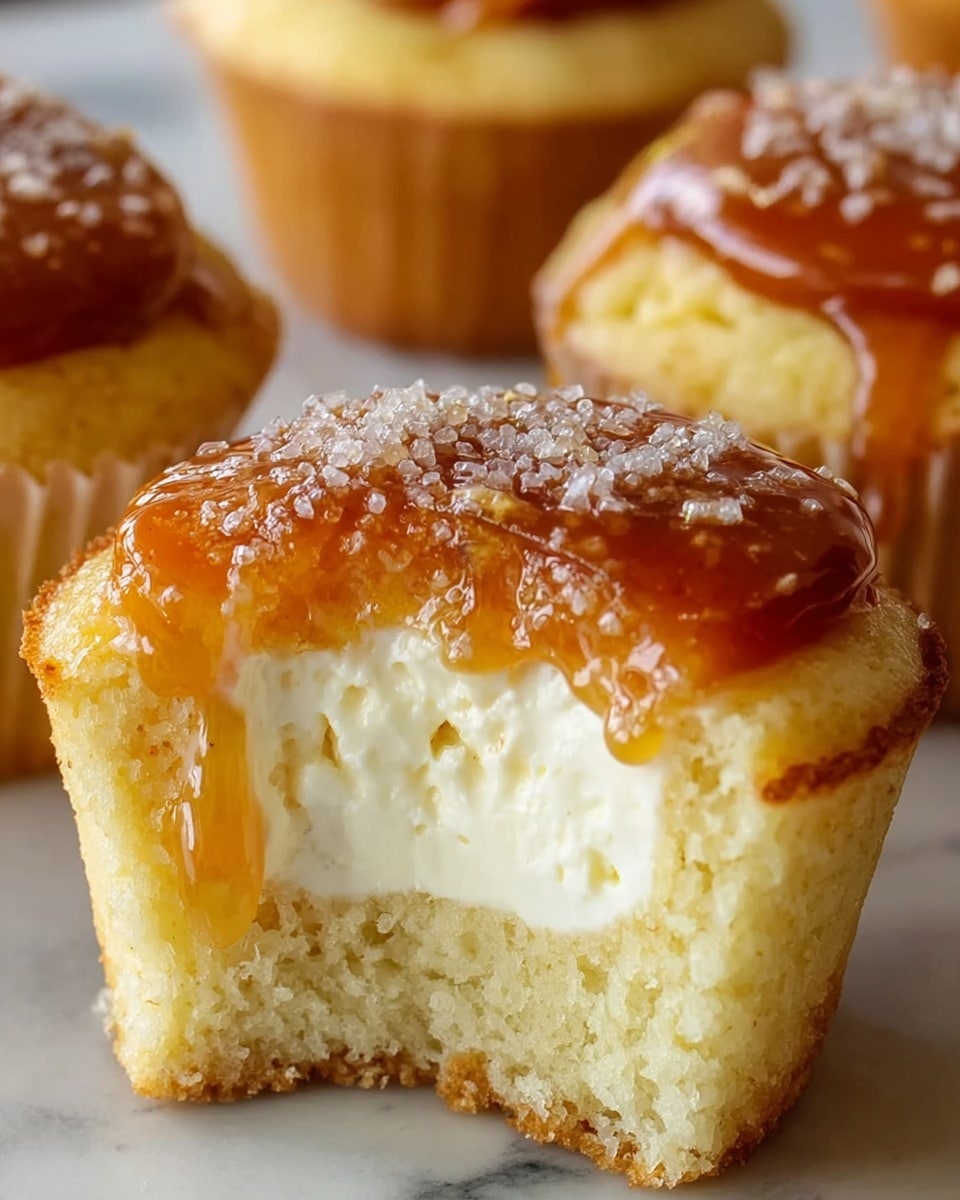
This delicious Vanilla Bean Crème Brûlée Cheesecake is a rich and creamy dessert that combines the smooth texture of classic cheesecake with the elegant, caramelized sugar crust of crème brûlée. Infused with real vanilla bean, it offers a sophisticated flavor and a satisfying crunch that makes every bite unforgettable.
Ingredients
- 2 cups graham cracker crumbs (about 16-18 crackers)
- ¼ cup granulated sugar (for crust)
- ½ cup unsalted butter, melted
- Pinch of salt (for crust)
- 24 oz cream cheese (three 8-oz blocks), softened to room temperature
- 1 cup granulated sugar (for filling)
- 3 large eggs, room temperature
- 1 cup sour cream, room temperature
- ¼ cup heavy cream
- 2 vanilla beans (seeds scraped) or 2 tablespoons vanilla bean paste
- 1 teaspoon pure vanilla extract
- 2 tablespoons all-purpose flour
- ¼ teaspoon salt (for filling)
- ½ cup granulated sugar (for caramelizing top)
- Extra vanilla bean seeds for garnish (optional)
Instructions
- Step 1: Preheat your oven to 325°F and wrap a 9-inch springform pan with heavy-duty aluminum foil to protect it from water. Grease the inside of the pan with butter or cooking spray. Bring cream cheese, eggs, and sour cream to room temperature (about 45 minutes) before starting.
- Step 2: In a medium bowl, combine graham cracker crumbs, ¼ cup sugar, and a pinch of salt. Stir in melted butter until the mixture resembles wet sand and holds together when pressed. Press firmly into the bottom and about 1 inch up the sides of the prepared pan. Bake for 10 minutes, then cool.
- Step 3: Beat the cream cheese on medium speed until smooth and fluffy (2-3 minutes). Add 1 cup sugar and beat for another 2 minutes. Mix in vanilla bean seeds (or paste) and vanilla extract until combined.
- Step 4: Add eggs one at a time, beating on low speed after each until just combined. Avoid overmixing. Mix in sour cream, heavy cream, flour, and salt on low speed until smooth, then pour over the cooled crust.
- Step 5: Place the springform pan in a larger roasting pan. Pour hot water into the roasting pan until it reaches halfway up the sides of the springform pan to create a water bath (bain-marie).
- Step 6: Bake for 55-65 minutes. The edges should be set and the center should jiggle slightly when you gently shake the pan. Watch closely near the end to avoid browning the edges too much.
- Step 7: Turn off the oven, crack the door open about 4 inches, and let the cheesecake sit inside for 1 hour. Remove from oven and water bath, run a thin knife around edges, and cool at room temperature for another hour.
- Step 8: Refrigerate the cheesecake for at least 6 hours, preferably overnight for best texture and flavor.
- Step 9: Before serving, sprinkle an even layer of granulated sugar (about 2 tablespoons) over the top. Use a kitchen torch to caramelize the sugar evenly until golden amber. If you don’t have a torch, carefully use the oven broiler, watching constantly.
- Step 10: Let the caramelized sugar harden for a minute or two, then serve immediately and enjoy the satisfying crack of the brûléed top with every slice.
Tips & Variations
- Use gluten-free graham crackers and replace flour with cornstarch for a gluten-free version.
- Reduce sugar in the filling by ¼ cup for a less sweet cheesecake; keep the sugar topping amount the same for proper caramelization.
- Swirl melted dark chocolate through the batter before baking to add a chocolate twist.
- Add 1 tablespoon of citrus zest (orange or lemon) to the filling for a bright flavor contrast.
- Mix in 2 tablespoons of instant espresso powder for a subtle coffee enhancement.
- Serve with a berry compote instead of caramelizing sugar for a fruity alternative topping.
Storage
Store the cheesecake covered in the refrigerator for up to 5 days. To keep cut edges from drying, place plastic wrap directly on them. The crust may soften slightly after a few days but remains tasty. You can freeze individual slices tightly wrapped in plastic wrap and foil for up to 2 months; thaw overnight in the fridge. Do not caramelize the sugar before freezing—always torch the top fresh before serving for best texture.
How to Serve

Serve this delicious recipe with your favorite sides.
FAQs
Can I make this without a water bath?
Technically yes, but it’s not recommended. The water bath provides gentle, humid heat that prevents cracking and keeps the cheesecake ultra-creamy. Without it, expect a drier, denser texture. If you skip it, bake at 300°F and place a pan of water on the rack below.
What if I don’t have a kitchen torch?
Your oven’s broiler can work in a pinch. Sprinkle sugar on top and broil for 1-2 minutes while watching closely, as the sugar can burn very quickly. A kitchen torch gives more control and a more even caramelization, making it a worthwhile investment for making this dessert repeatedly.
Print
Delicious Vanilla Bean Crème Brûlée Cheesecake Recipe
- Total Time: Approximately 7-8 hours including chilling (minimum 6 hours chilling recommended overnight)
- Yield: 12 servings 1x
Description
This Delicious Vanilla Bean Crème Brûlée Cheesecake combines the rich, creamy texture of New York-style cheesecake with the intense flavor of real vanilla beans and a satisfying caramelized sugar topping. Featuring a buttery graham cracker crust and a silky smooth filling made with cream cheese, sour cream, and heavy cream, it’s baked gently in a water bath to prevent cracks. The final torch caramelized layer adds a delightful crunchy contrast, making every slice a decadent, multi-textured dessert experience.
Ingredients
Graham Cracker Crust
- 2 cups graham cracker crumbs (about 16–18 crackers)
- ¼ cup granulated sugar
- ½ cup unsalted butter, melted
- Pinch of salt
Cheesecake Filling
- 24 oz cream cheese (three 8-oz blocks), softened to room temperature
- 1 cup granulated sugar
- 3 large eggs, room temperature
- 1 cup sour cream, room temperature
- ¼ cup heavy cream
- 2 vanilla beans, seeds scraped (or 2 tablespoons vanilla bean paste)
- 1 teaspoon pure vanilla extract
- 2 tablespoons all-purpose flour
- ¼ teaspoon salt
Crème Brûlée Topping
- ½ cup granulated sugar (for caramelizing)
- Extra vanilla bean seeds for garnish (optional)
Instructions
- Prepare Ingredients and Equipment: Bring cream cheese, eggs, and sour cream to room temperature (about 45 minutes) to avoid lumps. Preheat oven to 325°F. Wrap the outside of a 9-inch springform pan tightly with heavy-duty aluminum foil to waterproof it for the water bath, and grease the inside with butter or cooking spray.
- Make the Graham Cracker Crust: In a medium bowl, combine graham cracker crumbs, sugar, and a pinch of salt. Stir in melted butter until the mixture resembles wet sand and holds together when pressed. Firmly press this mixture into the bottom and about 1 inch up the sides of the prepared pan. Use the bottom of a measuring cup to pack it down tightly. Bake crust for 10 minutes, then cool while preparing the filling.
- Prepare the Cheesecake Filling: Using an electric mixer on medium speed, beat the cream cheese for 2-3 minutes until smooth and fluffy with no lumps. Scrape the bowl. Add sugar and beat another 2 minutes. Mix in vanilla bean seeds (or vanilla bean paste) and vanilla extract until combined. Add eggs one at a time, mixing on low speed just until incorporated after each addition to avoid adding air. On low speed, blend in sour cream, heavy cream, flour, and salt until smooth and silky.
- Assemble and Bake: Pour the filling over the cooled crust in the springform pan. Place the pan inside a larger roasting pan. Carefully pour hot water into the roasting pan until it reaches halfway up the sides of the springform pan to create a water bath. Bake the cheesecake for 55-65 minutes. The edges should be set, but the center should jiggle slightly when gently shaken.
- Cool Gradually: Turn off the oven, crack the door open about 4 inches, and let the cheesecake sit inside for 1 hour to cool slowly and prevent cracking. Remove the pan from the water bath, run a thin knife around the edges to loosen, and cool at room temperature for another hour.
- Chill: Refrigerate the cheesecake for at least 6 hours, preferably overnight, to set the texture and develop flavors fully.
- Add the Crème Brûlée Topping: Before serving, remove the cheesecake from the springform pan and place it on a serving plate. Sprinkle an even layer of granulated sugar (about 2 tablespoons) over the top. Using a kitchen torch, caramelize the sugar with circular motions until it melts and turns a deep amber color. Alternatively, use the oven broiler on high, watching closely to avoid burning. Let the caramelized sugar harden for 1-2 minutes before serving.
Notes
- Use gluten-free graham crackers and cornstarch instead of flour for a gluten-free version.
- Reduce sugar in the filling by ¼ cup for a lower sugar option; do not reduce topping sugar.
- Make the cheesecake 2-3 days ahead for best flavor; torch the sugar topping just before serving.
- If you don’t have a kitchen torch, use the oven broiler but watch closely to prevent burning.
- Do not overmix after adding eggs to avoid a dense texture.
- Water bath is critical for a creamy, crack-free cheesecake.
- Run a knife around edges before cooling to prevent cracks.
- Store leftovers covered in the fridge for up to 5 days; sugar top can be re-torched to crisp again.
- Freeze slices wrapped tightly for up to 2 months; thaw overnight in fridge and torch sugar fresh before serving.
- Prep Time: 25 minutes active plus 45 minutes to bring ingredients to room temperature
- Cook Time: 55-65 minutes baking, plus 1 hour cooling in oven, 1 hour room temperature cooling
- Category: Dessert
- Method: Baking
- Cuisine: American
Keywords: Vanilla bean cheesecake, crème brûlée topping, graham cracker crust, water bath cheesecake, rich creamy dessert, caramelized sugar, vanilla bean dessert
