
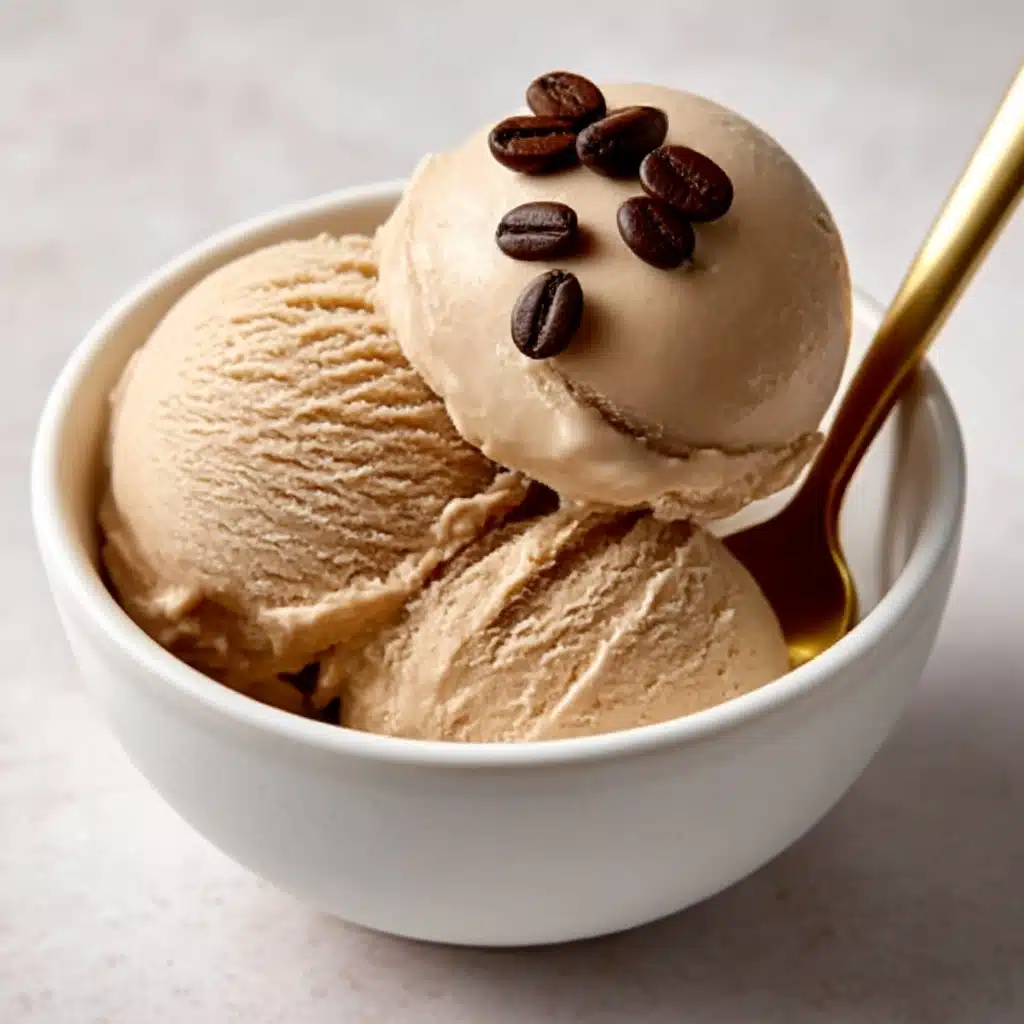
Coffee Ice Cream Recipe
If you are a devoted coffee lover and ice cream enthusiast, then this Coffee Ice Cream recipe is about to become your new favorite treat. Silky, smooth, and bursting with the rich, bold flavor of freshly ground coffee, this homemade delight offers a beautifully balanced sweetness that keeps you coming back for more. Whether enjoyed on a warm afternoon or as a decadent dessert after dinner, this recipe captures the essence of coffee in every creamy, dreamy spoonful. Trust me, once you taste this Coffee Ice Cream, it will forever change the way you think about frozen desserts.
Ingredients You’ll Need
This Coffee Ice Cream recipe keeps things wonderfully simple yet incredibly satisfying, with ingredients carefully chosen to build layers of flavor and creamy texture. Each element plays a vital role—from the rich heavy cream giving it lusciousness, to the freshly ground coffee beans delivering that unmistakable aromatic punch.
- Heavy cream (2 cups): Supplies the luxurious richness and creamy mouthfeel essential to quality ice cream.
- Whole milk (1 cup): Balances the cream’s thickness while keeping the texture smooth and lighter.
- Granulated sugar (¾ cup): Sweetens without overpowering the natural coffee notes.
- Salt (¼ teaspoon): Enhances all the flavors and deepens the coffee intensity.
- Vanilla bean, split and scraped (1) or vanilla extract (1 teaspoon): Adds a warm, subtle vanilla aroma that complements the coffee perfectly.
- Freshly ground coffee beans (½ cup): Infuses deep, robust coffee flavor; a medium-dark roast is ideal for smooth bitterness.
- Coffee liqueur (optional, ¼ cup): Introduces an extra layer of complexity and a slight kick of boozy richness.
- Chocolate shavings or espresso beans (optional garnish): Provide a beautiful finishing touch with textural contrast and taste.
How to Make Coffee Ice Cream
Step 1: Combine and Heat the Cream Mixture
Start by whisking together the heavy cream, whole milk, sugar, and salt in a medium saucepan. It’s important to stir until the sugar mostly dissolves, which ensures a perfectly smooth texture later on. Adding the vanilla bean seeds and pod at this stage will let that lovely vanilla scent infuse gently with the cream.
Step 2: Add the Coffee and Heat to Steam
Stir in the freshly ground coffee beans and heat the mixture over medium heat, stirring constantly. You want it steaming hot with tiny bubbles forming at the edges—this process helps to extract all the rich coffee oils and flavor into your base, making every bite vibrant and aromatic.
Step 3: Steep the Coffee
Remove the pan from heat and cover it tightly, letting the coffee grounds steep in the warm cream for at least one hour. The longer you steep, up to two hours, the more pronounced the coffee flavor will be—a great way to tailor the intensity to your liking.
Step 4: Strain out the Grounds and Add Final Flavorings
After steeping, strain the mixture through a fine mesh sieve lined with cheesecloth to catch every bit of coffee grounds and the vanilla bean pod. If you used vanilla extract instead of the bean, stir it in now along with any optional coffee liqueur to add a subtle boozy richness that enhances depth without overpowering.
Step 5: Chill and Churn
Cover the coffee cream mixture with plastic wrap pressed directly onto the surface and chill it thoroughly for at least four hours or overnight. Once well chilled, pour it into your prepared ice cream maker and churn following the manufacturer’s instructions. After about 20 to 25 minutes, you’ll be rewarded with luxuriously creamy Coffee Ice Cream that’s almost ready to enjoy.
Step 6: Freeze until Firm
Transfer the churned ice cream to an airtight container, pressing plastic wrap on the surface to prevent ice crystals. Freeze for a minimum of 2 to 3 hours to achieve that perfect scoopable consistency you love in Coffee Ice Cream.
How to Serve Coffee Ice Cream

Garnishes
Elevate your Coffee Ice Cream by topping it with a handful of chocolate shavings or a few espresso beans. These simple additions not only create a lovely visual contrast but also add delightful bursts of flavor and texture with every bite.
Side Dishes
This ice cream pairs beautifully with crisp biscotti or buttery shortbread cookies, making for an indulgent coffee-themed dessert experience. Serve alongside a shot of espresso or a creamy latte for a true coffee lover’s dream.
Creative Ways to Present
Try serving your Coffee Ice Cream in elegant coupe glasses with a drizzle of chocolate or caramel sauce. Or pack it into waffle cones for a fun, handheld treat. For a boozy twist, spoon it over an affogato by pouring a shot of hot espresso right on top—instant café luxury at home!
Make Ahead and Storage
Storing Leftovers
If you find yourself with leftover Coffee Ice Cream, make sure to keep it in an airtight container to preserve that fresh-from-the-churn creaminess. Proper sealing is key to avoiding freezer burn and maintaining its rich coffee flavor.
Freezing
This ice cream freezes wonderfully for up to two weeks. Just remember to press plastic wrap onto the surface each time you return it to the freezer to prevent crystallization and keep the texture silky smooth.
Reheating
Coffee Ice Cream is always best enjoyed cold right from the freezer. If it’s too hard to scoop, let it sit at room temperature for about 5 minutes—this softens it slightly without losing that signature creamy texture.
FAQs
Can I use instant coffee instead of freshly ground beans?
While instant coffee can work in a pinch, using freshly ground medium-dark roast beans gives a deeper, more complex flavor that really shines in Coffee Ice Cream.
Is it possible to make this recipe dairy-free?
Yes! Substitute heavy cream and whole milk with coconut cream and almond milk for a dairy-free version. Keep an eye on freezing times, as texture might vary slightly.
Can I skip the coffee liqueur?
Absolutely. The coffee liqueur is optional and used to enhance flavor depth, but your ice cream will still be delicious without it.
How long does the steeping process affect flavor?
The longer you steep the coffee grounds in the cream mixture (up to two hours), the stronger and richer the coffee flavor becomes. For a lighter taste, you can steep for just an hour.
Do I need an ice cream maker for this recipe?
While an ice cream maker produces the creamiest texture, you can also freeze the mixture and stir it every 30 minutes to break up ice crystals if you don’t have a machine—though the texture will be slightly different.
Final Thoughts
This Coffee Ice Cream recipe is a heartfelt invitation to indulge in your passion for coffee in a charmingly cool, creamy form. It’s easy to make, simply delightful, and bound to impress anyone lucky enough to sample it. So why not gather your ingredients and start churning your own batch? I promise this will quickly become a beloved staple whenever you crave a little coffee-inspired magic.
Print
Coffee Ice Cream Recipe
- Total Time: 5 hours 22 minutes
- Yield: About 1 quart (4 servings) 1x
- Diet: Vegetarian
Description
This rich and creamy Coffee Ice Cream recipe combines bold freshly ground coffee flavors with smooth vanilla and a hint of coffee liqueur for an indulgent frozen treat. With simple ingredients and an easy infusion method, this homemade ice cream is perfect for coffee lovers craving a delightful dessert.
Ingredients
Main Ingredients
- 2 cups heavy cream
- 1 cup whole milk
- ¾ cup granulated sugar
- ¼ teaspoon salt
- 1 vanilla bean, split lengthwise and seeds scraped (or 1 teaspoon vanilla extract)
- ½ cup freshly ground coffee beans (medium-dark roast recommended)
Optional Ingredients
- ¼ cup coffee liqueur (such as Kahlua)
- Chocolate shavings or espresso beans for garnish
Instructions
- Combine Cream, Milk, Sugar, and Salt: In a medium saucepan, whisk together the heavy cream, whole milk, granulated sugar, and salt until the sugar is mostly dissolved to create a smooth base.
- Add Vanilla: If using a vanilla bean, scrape the seeds into the cream mixture and add the vanilla pod as well for deep flavor infusion. If using vanilla extract, hold off adding it until after the mixture has cooled.
- Infuse with Coffee: Stir in the freshly ground coffee beans into the cream mixture evenly.
- Heat the Mixture: Place the saucepan over medium heat and stir constantly until the mixture is steaming and small bubbles form around the edges, approximately 5-7 minutes, to infuse coffee flavors properly.
- Steep the Coffee: Remove from heat, cover the saucepan, and let the mixture steep for at least 1 hour or up to 2 hours for a stronger coffee flavor.
- Strain the Mixture: Strain the mixture through a fine-mesh sieve lined with cheesecloth into a clean bowl. Press on the coffee grounds gently to extract as much liquid as possible.
- Discard Solids: Remove and discard the strained coffee grounds and the vanilla bean pod if used.
- Add Vanilla Extract (if using): Stir in the vanilla extract now if you opted for it instead of the vanilla bean.
- Add Coffee Liqueur (optional): Stir in coffee liqueur at this stage for a richer flavor and slight boozy undertone.
- Chill Thoroughly: Cover the bowl with plastic wrap pressed against the surface to prevent skin formation, and refrigerate for at least 4 hours or preferably overnight to chill the mixture thoroughly.
- Prepare the Ice Cream Maker: Remove your ice cream maker bowl from the freezer and assemble the machine as per the manufacturer’s instructions to get ready for churning.
- Pour in the Mixture: Pour the chilled coffee cream mixture into the cold ice cream maker bowl evenly.
- Churn: Turn on the ice cream maker and churn the mixture for 20-25 minutes or until it reaches a soft-serve consistency, allowing air to be incorporated for a creamy texture.
- Transfer to a Container: Transfer the soft coffee ice cream into an airtight container, smoothing the top evenly.
- Harden in the Freezer: Press a piece of plastic wrap directly onto the ice cream surface in the container to prevent ice crystals. Seal and freeze for 2-3 hours or overnight for a firm texture.
- Serve and Enjoy: Scoop the hardened coffee ice cream into bowls or cones and garnish with chocolate shavings or espresso beans if desired for an elegant presentation.
Notes
- Using a medium-dark roast coffee brings out the best flavor without being too bitter.
- Steeping times can be adjusted based on your preferred coffee intensity.
- Ensure the mixture is fully chilled before churning to get the best texture.
- The coffee liqueur is optional but enhances the flavor complexity.
- If you don’t have an ice cream maker, you can freeze the mixture in a shallow container and stir every 30 minutes until firm.
- Prep Time: 15 minutes
- Cook Time: 7 minutes
- Category: Dessert
- Method: Stovetop infusion and ice cream maker churning
- Cuisine: American
Nutrition
- Serving Size: ½ cup (approximately 120g)
- Calories: 310
- Sugar: 25g
- Sodium: 70mg
- Fat: 24g
- Saturated Fat: 15g
- Unsaturated Fat: 8g
- Trans Fat: 0g
- Carbohydrates: 22g
- Fiber: 0.5g
- Protein: 3g
- Cholesterol: 95mg
Keywords: coffee ice cream, homemade ice cream, coffee dessert, frozen coffee treat, creamy ice cream recipe


