
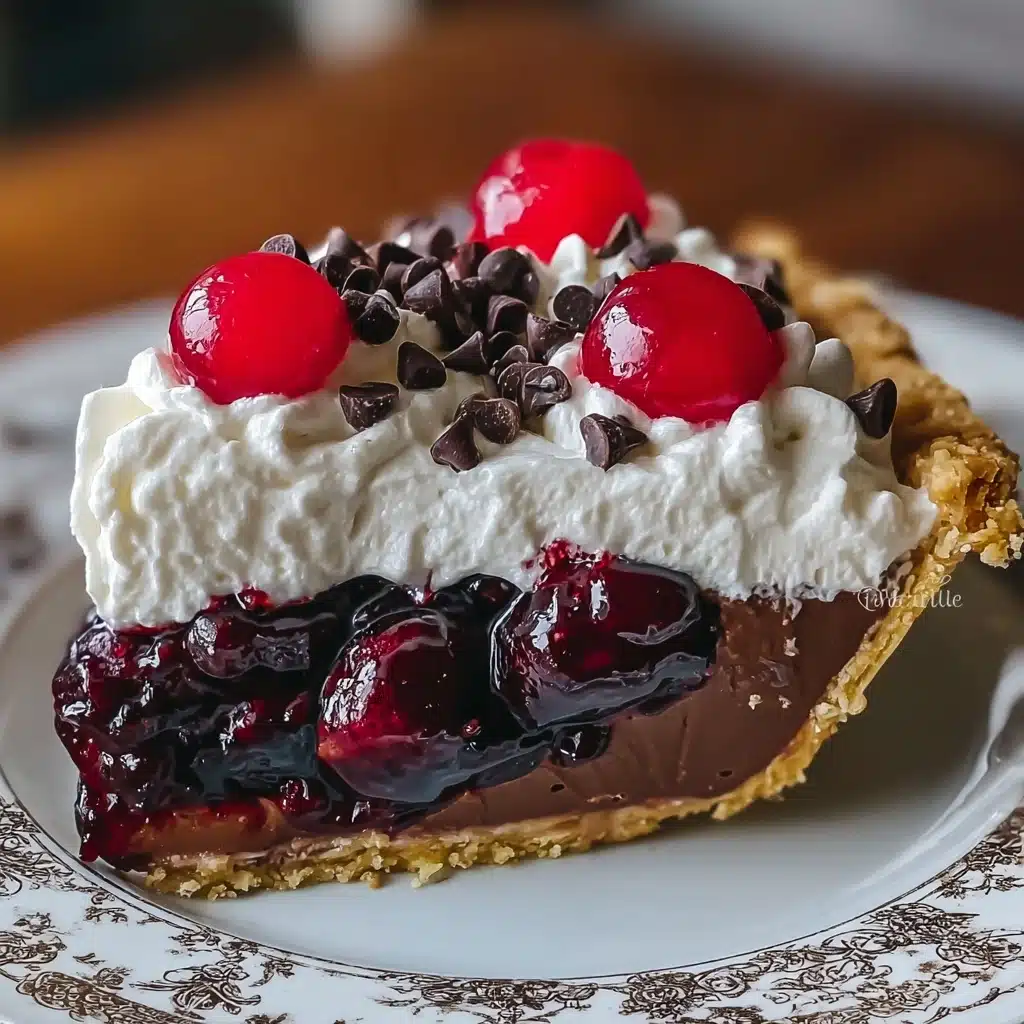
Chocolate Cherry Cream Pie Recipe
If there’s one dessert that always gets a round of applause at gatherings, it’s the indulgent, luscious Chocolate Cherry Cream Pie. With its showstopping layers of sweet-tart cherries, creamy chocolate pudding, and billowy whipped cream, this pie brings together classic flavors in a way that feels both nostalgic and absolutely irresistible. Whether you’re celebrating a special occasion or just treating yourself on a weeknight, Chocolate Cherry Cream Pie is a simple yet unforgettable crowd-pleaser you’ll want to make again and again.
Ingredients You’ll Need
The beauty of this pie is in its simplicity! Each ingredient plays a starring role—think crisp crust for structure, plush cherry filling for a burst of flavor, creamy chocolate for richness, and that cloud of whipped cream for the perfect finish. Here’s what you’ll need to make Chocolate Cherry Cream Pie shine:
- Pre-baked 9-inch pie crust: This is the sturdy base that keeps all those luscious layers together—make your own or buy one for convenience!
- 1 can (21 oz) cherry pie filling: Sweet and slightly tart, this is the heart of the pie. Homemade is lovely, but store-bought works beautifully here.
- 1 box (3.9 oz) chocolate pudding mix: The creamy chocolate layer creates that dreamy, decadent texture everyone loves.
- 2 cups cold milk: Essential for whipping up the pudding—cold milk ensures the filling sets up thick and silky.
- 1 ½ cups whipped cream: Fluffy and light, this top layer balances the richness and finishes off the pie with a flourish.
- ½ cup chocolate chips (semi-sweet or dark): Sprinkled on top, these add a little crunch and extra chocolate punch.
- Fresh cherries for garnish (optional): Totally optional, but they make the presentation truly pop, especially for special occasions.
How to Make Chocolate Cherry Cream Pie
Step 1: Prepare and Cool the Pie Crust
Before you dive into layering, make sure your 9-inch pie crust is fully baked and completely cooled to room temperature. This step helps prevent a soggy bottom and ensures the layered fillings stay distinct and beautiful when sliced.
Step 2: Add the Cherry Filling
Spoon the cherry pie filling into your cooled crust, spreading it evenly over the bottom. This layer brings a burst of sweet-tart cherry flavor to every single bite, plus a gorgeous pop of color once you slice into the pie.
Step 3: Whisk the Chocolate Pudding
In a mixing bowl, combine the chocolate pudding mix and cold milk. Whisk for about 2 minutes, just until it thickens but is still spreadable. Immediately pour and smooth the pudding over the cherry layer to create that silky, decadent chocolate middle.
Step 4: Spread the Whipped Cream
Gently spread a generous cloud of whipped cream over the set chocolate pudding. An offset spatula works wonders here for achieving that smooth, irresistible finish—it truly makes the Chocolate Cherry Cream Pie look bakery-worthy.
Step 5: Add Chocolate Chips and Fresh Cherries
Sprinkle chocolate chips evenly across the top, adding rich pops of texture and flavor. If you’re feeling extra festive, dot the pie with a few fresh cherries—a gorgeous finishing touch that feels like a little extra love.
Step 6: Chill and Let the Layers Set
Transfer your pie to the refrigerator and chill for at least 2 hours. This essential step allows the layers to meld and firm up, making slicing and serving a breeze while letting the flavors marry perfectly.
Step 7: Slice and Serve Chilled
Once chilled, slice your Chocolate Cherry Cream Pie with a sharp, clean knife for the best presentation. Serve cold for a cool, creamy, and utterly delightful treat that’s as beautiful as it is delicious!
How to Serve Chocolate Cherry Cream Pie

Garnishes
The cherry on top—literally! To take your pie to the next level, add a handful of fresh cherries and an extra curl of chocolate or two just before serving. A dusting of cocoa powder gives an elegant finish, making every plate look straight out of a pastry shop.
Side Dishes
Since this dessert is rich and satisfying, pair slices of Chocolate Cherry Cream Pie with something light and refreshing. A simple fruit salad or a scoop of vanilla ice cream adds a cool, fruity contrast that doesn’t overpower the star attraction.
Creative Ways to Present
Individual mini pies are showstopping for parties—simply divide the process among tartlet shells. Or, serve slices in clear glass parfait cups, layering the pie elements for a stunning, deconstructed effect that’s stylish and fun for guests.
Make Ahead and Storage
Storing Leftovers
If you’re lucky enough to have any leftover Chocolate Cherry Cream Pie, store it loosely covered with plastic wrap in the refrigerator. It’ll stay fresh, creamy, and delicious for up to 3 days—just be sure to pop it back in the fridge after serving.
Freezing
Chocolate Cherry Cream Pie actually freezes quite well! For best results, freeze individual slices on a baking sheet, then transfer to an airtight container. Thaw overnight in the refrigerator before serving; the texture remains surprisingly luscious.
Reheating
No need (or desire!) to reheat this pie—Chocolate Cherry Cream Pie is made to be served cool. Simply slice and enjoy straight from the fridge or after a gentle thaw if previously frozen.
FAQs
Can I use homemade cherry pie filling?
Absolutely! Homemade cherry filling gives you control over sweetness and texture—it’s a delicious upgrade if you have time, but canned filling makes prep a snap with equally tasty results.
What type of pie crust works best?
Both homemade and store-bought 9-inch pie crusts work beautifully here. A classic buttery pastry crust is perfect, but a chocolate cookie crust would be divine for extra chocolate flavor!
Can I use instant chocolate pudding instead of cook-and-serve?
Yes, instant pudding speeds up the process and tastes fantastic. Just be sure to chill the pie long enough to let all the layers set up nicely.
Is it possible to make this pie dairy-free?
Definitely! Use your favorite non-dairy milk for the pudding, vegan whipped topping, and a dairy-free chocolate crust if needed. The pie maintains all its deliciousness with a few easy swaps.
How do I prevent a soggy crust?
Making sure your crust is fully baked and completely cooled before adding the fillings is key. If you’re worried, brush the baked crust with a little melted chocolate and let it set—it adds a barrier, plus extra chocolatey goodness!
Final Thoughts
I can’t wait for you to whip up this Chocolate Cherry Cream Pie in your own kitchen. It’s the simplest way to delight chocolate and cherry lovers alike—just layer, chill, and prepare for a flood of compliments. Give it a try, and don’t be surprised if it becomes your go-to dessert for any occasion!
Print
Chocolate Cherry Cream Pie Recipe
- Total Time: 2 hours 20 minutes
- Yield: 1 9-inch pie (8 servings) 1x
- Diet: Vegetarian
Description
Indulge in the decadent delight of Chocolate Cherry Cream Pie. This luscious dessert features layers of rich chocolate pudding, sweet cherry filling, and fluffy whipped cream, all nestled in a flaky pie crust. Topped with chocolate chips and fresh cherries, this pie is a perfect balance of flavors and textures.
Ingredients
For the Pie:
- 1 pre-baked 9-inch pie crust
- 1 can (21 oz) cherry pie filling (or homemade)
For the Chocolate Layer:
- 1 box (3.9 oz) chocolate pudding mix
- 2 cups cold milk (for pudding mix)
For the Whipped Cream Topping:
- 1 ½ cups whipped cream (homemade or store-bought)
- ½ cup chocolate chips (semi-sweet or dark)
- Fresh cherries for garnish (optional)
Instructions
- Ensure the pie crust is pre-baked and fully cooled before assembling. This ensures a crisp, sturdy base for the pie.
- Spread the cherry pie filling evenly across the bottom of the crust. This forms the fruity base of the pie.
- Prepare the chocolate pudding according to the package instructions using cold milk. Let it thicken slightly, then spread it over the cherry layer.
- Gently spread whipped cream over the chocolate layer, creating a smooth, even topping. This adds a light, creamy texture.
- Sprinkle chocolate chips over the whipped cream, and add fresh cherries for extra flavor and presentation. This enhances the visual appeal and taste of the pie.
- Chill the pie in the refrigerator for at least 2 hours to allow the layers to set. This ensures the pie is firm and ready to slice.
- Slice and serve chilled for a rich and creamy chocolate-cherry treat! Enjoy the delicious layers of flavor in every bite.
- Prep Time: 20 minutes
- Cook Time: 0 minutes
- Category: Dessert
- Method: Baking
- Cuisine: American
Nutrition
- Serving Size: 1 slice
- Calories: 320
- Sugar: 22g
- Sodium: 260mg
- Fat: 15g
- Saturated Fat: 8g
- Unsaturated Fat: 6g
- Trans Fat: 0g
- Carbohydrates: 42g
- Fiber: 1g
- Protein: 4g
- Cholesterol: 20mg
Keywords: Chocolate Cherry Cream Pie, Dessert, Chocolate Pudding, Cherry Filling, Whipped Cream, Pie Recipe
